

Installing a Self-Adhesive Tanking Membrane System
Effective external waterproofing is critical to limiting the chance of water ingress into below-ground structures. There are various structural waterproofing systems available including self-adhesive primary waterproofing. Thanks to its easy-to-apply design and reliability, installing a self-adhesive membrane is an efficient and straightforward way to ensure a basement is protected.
In this guide, we look at how to install a self-adhesive membrane for external waterproofing, including when gas protection and ICF systems are used. Read on to find out more.
What is a self-adhesive waterproofing system?
A self-adhesive waterproofing system constitutes the primary waterproofing layer as part of a wider external or structural waterproofing system for a below-ground structure. The system consists of a special primer and a self-adhesive membrane.
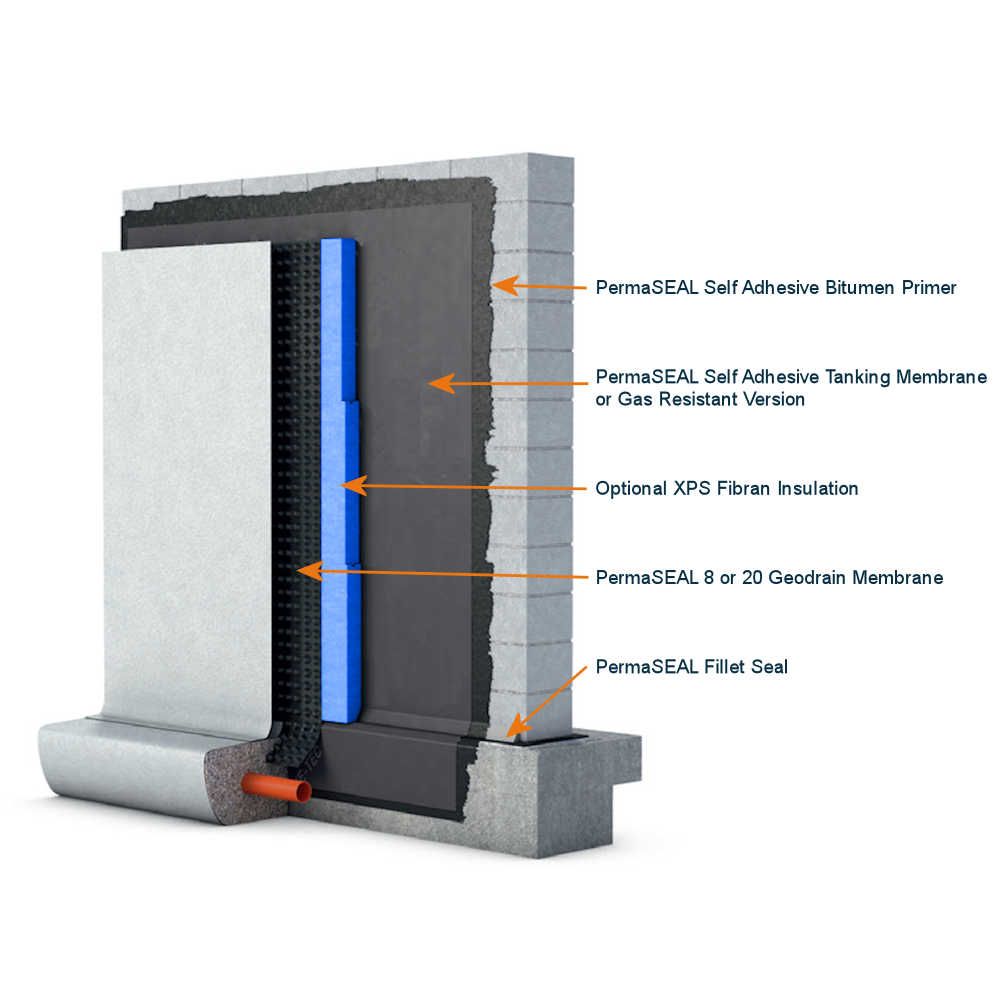
The primary waterproofing layer is critical to the success of external waterproofing. One highly effective and efficient option is to install a self-adhesive tanking system as the first line of defence against water under hydrostatic pressure.
Bringing together a self-adhesive primer and a self-adhesive tanking membrane helps prevent water from entering the structure. For your primary waterproofing, you could consider using a structural waterproofing product like PermaSEAL PRO MP 2C thick coating as an alternative.
We always recommend combining this with a secondary waterproofing layer like a PermaSEAL 8 Geodrain or PermaSEAL 20 Geodrain membrane to ensure you’re fully protected, and water is safely channelled away from your structure.
Read our guide for more information about creating a comprehensive external waterproofing system.
What is a self-adhesive membrane?
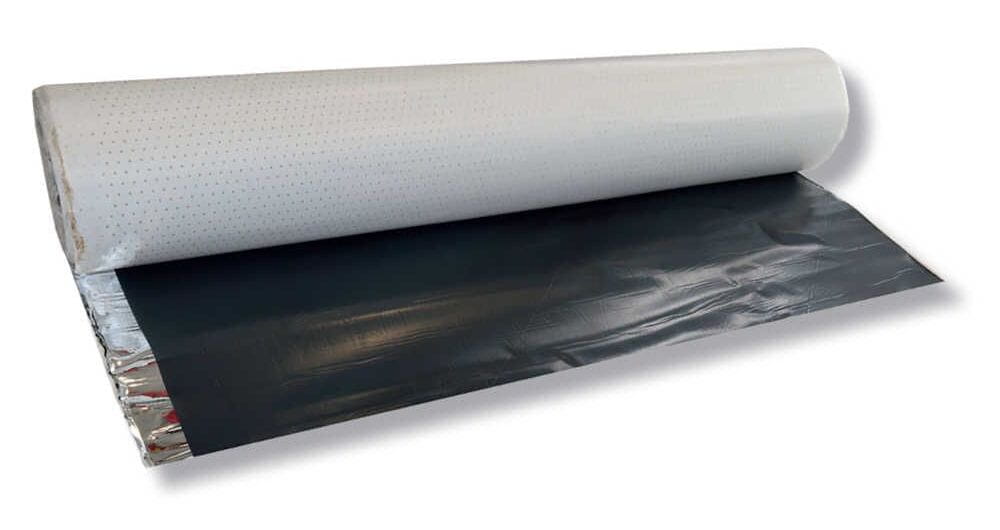
A self-adhesive membrane is a tough, tear-resistant HDPE sheet that blocks the passage of water. What makes it different from other membranes is one side is covered with a strong sealing adhesive with bitumen rubber that bonds to a range of surfaces. It can be applied in a similar way to wallpaper, making it a fast, effective way to install primary waterproofing on your below-ground structure.
Where can I use a self-adhesive tanking membrane?
Our self-adhesive waterproof membranes are designed for external use in below-ground structures such as cellars and basements, including ICF block constructions. We also have gas-resistant self-adhesive membranes that prevent ground gases from entering your structure, as well as moisture.
Because of their self-adhesive properties, they’re much easier to use than other types of membranes. They’re quick to install and provide instant waterproofing. In the next section, we explain the installation process.
How to install a self-adhesive waterproof system
While installing a self-adhesive membrane is quick and straightforward, it’s the first line of defence against moisture ingress for your property - so it’s important that it’s installed correctly. Below, we break this down into easy-to-follow steps.
Preparing the wall
As the whole process is best done in a single day, you should try to wait for the right conditions before starting work. The self-adhesive membrane should only be fitted in dry weather between 5-30°C. Avoid damp or misty conditions where more water vapour is likely to be in the air, as this will hinder adhesion. Applying it in direct sunlight on cooler days is ideal. If you need to apply it in very low temperatures, use a heat gun to make the membrane more adhesive.
When you have the right conditions, the first step is to ensure the surface is clean, dry and free from debris. Any protruding sharp edges should be smoothed to ensure no damage is done to the membrane while installing, and any gaps or cavities should be repaired with an appropriate mortar.
Priming the wall
Once the surface is clean and free from defects, you need to prime the wall. A self-adhesive tanking primer helps ensure the surface is dust-free and creates a complete bond with the membrane - providing more effective waterproofing protection.
Our primer is easy to apply. Just roll or brush it onto the surface and allow it to dry. Drying times vary, but you should allow no less than 1.5 hours and generally no more than six before fitting the membrane. If you leave it too long, dirt and dust will settle on the primer - affecting its adhesion.
A good test to ensure the primer is ready is to cut a small strip of the self-adhesive membrane and apply this to the primed surface. Wait a few minutes and then tear off the strip. If the primer comes away with the strip, the primer hasn’t adequately dried. The level of adhesion is correct if it takes a lot of force to tear off the membrane.
Fitting the membrane
Once the primer has dried, you’re ready to fit the membrane.
To set up, cut the sheets to length and then roll them back up.
If you’re tanking a large area, begin by covering all outside edges, corners, valleys etc with reinforcement strips so they have two layers of the membrane in total. This will help ensure there are no weak points in your system - even on risky features. Strips should be cut to around 200-300mm wide.
When you’re ready to apply the main sheets, remove the protective paper from the underside and stick the membrane onto the surface from top to bottom. Working top-down, start at the centre of the membrane and push firmly, moving outwards to ensure a good seal. Remove the grey strip (standard version) or white strip (gas version) along the edge for extra adhesion to the next overlapping strip.
Each subsequent strip should overlap by 100mm. Corners can either be covered by a 300mm wide strip, or a sheet can be folded around a corner - ensuring it extends approximately 150mm on the other side.
Rework and press down all sheets and overlaps using a roller. You then need to secure the sheets.
If you’re applying the membrane to shuttered concrete, you can just seal the top edge using PermaSEAL Overtape. If you’re applying them to general masonry, you can fix the sheets with stainless steel nails, spaced 500mm apart, and then cover them with PermaSEAL Overtape. Before fitting the tape, apply primer to the wall above the membrane where the tape will be installed.
You’re now ready to fit your secondary waterproofing layer.
Negotiating features of the wall
Pipes: If you have a pipe protruding from the wall, cut two squares of membrane approximately 300 x 300mm. Mark one edge of each sheet with the circumference of the pipe. Make star-shaped cuts in these marked areas and install the sheets above and below the pipe so the cut sections overlap the pipe and press firmly. Apply a 100mm strip of membrane to the transition between the wall and the pipe.
Corners: For inside corners, cut out a square, make a cut into the middle and press it into the corner. For added safety, apply a triangular cut section to the middle. For outside corners, cut a square measuring 300 x 300mm. Make a cut in the middle and glue it to the corner. For added safety, apply a triangular cut section.
Expansion joints: Cut a strip that’s 500mm wide and long enough to adequately cover the joint and cut the backing paper 200mm away from both edges lengthwise. Make a deep valley above the join. Remove the pre-cut backing paper on one edge of the sheet and secure the membrane along the joint. Push the centre part into the joint. Take the backing paper off the other edge and secure it to the wall. Fix to the joining sheet of membrane with an overlap of 200mm up to the joint.
Fitting a self-adhesive gas membrane system
Ground gases are present in some areas of the UK. These can include radon and methane. If you’re building in an area where these gases are found, you’ll need to install a gas membrane. Installing a self-adhesive membrane to protect against gases follows the same process as our standard membrane.
How to install a gas membrane
To properly block ground gases from entering the structure, you’ll need to fit our PermaSEAL Self-Adhesive Gas Membrane. This is specially formulated to block gases from penetrating the membrane. You can use the same primer as the standard membrane to ensure a gas-tight seal.
Applying your gas membrane follows the same process described above.
Applying a self-adhesive membrane system to ICF Blocks
There are several benefits to an ICF structure. They are usually faster to install, stronger, cheaper and more energy efficient than breeze blocks. Protecting a below-ground ICF structure from moisture ingress with a self-adhesive membrane is similar to the standard process. Due to their structure, there is a difference that you need to be aware of when installing. We look at this below.
Fitting a self-adhesive membrane system to ICF block
You can use our standard self-adhesive tanking membrane to waterproof ICF block structures. The process of installation is the same as described above, except for the priming stage. ICF requires a water-based primer.
Permagard: Self-adhesive membrane system specialists
At Permagard, we stock self-adhesive membranes and primers that will ensure your external waterproofing effectively resists moisture ingress. Whether you need something that protects against gas or you’re waterproofing an ICF structure, we have everything you need.
If you need any help or support choosing the correct products or with your waterproofing project, we’re here to help. You can contact us by email at [email protected] or by calling 0117 982 3282.


